mNo edit summary |
(Lvl 16 is a time Attack lvl, but didn't have the time to beat listed yet. I added this.) Tags: Visual edit apiedit |
||
| (43 intermediate revisions by 12 users not shown) | |||
| Line 1: | Line 1: | ||
| − | [[File: |
+ | [[File:Chapter 1.png|center]] |
| + | |||
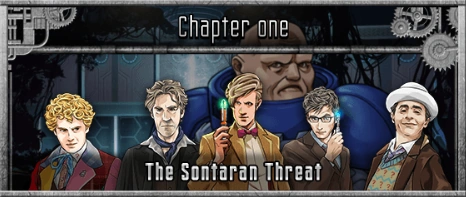
| ⚫ | '''Chapter 1: The Sontaran Threat''' (originally known as '''Season 7''') is one of the two seasons of ''Doctor Who: Legacy'' available since its initial launch. Its content features primarily creatures, companions, and plot lines from the seventh season of the revived television series. The season is 48 levels long and grants access to 24 allies and 9 alternate outfits. |
||
| ⚫ | '''Chapter 1''' (originally known as '''Season 7''') is one of the |
||
| − | {{tardis|Series 7}} |
||
__TOC__ |
__TOC__ |
||
== Levels == |
== Levels == |
||
| Line 17: | Line 17: | ||
! XP Earned |
! XP Earned |
||
|- |
|- |
||
| − | | data-sort-value="0" | — || align="left" | Tutorial || || — || [[File:The Eleventh Doctor head.png|50px |
+ | | data-sort-value="0" | — || align="left" | [[Tutorial]] || || — || [[File:The Eleventh Doctor head.png|50px|link=Eleventh Doctor]][[File:Madame Vastra head.png|50px|link=Madame Vastra]][[File:Jenny Flint head.png|50px|link=Jenny Flint]] || 3 || — || 50 |
|- |
|- |
||
| 1 || align="left" | [[Nightmare in Silver: Closed for Business]] || [[File:tv.png|25px|Episode tie-in]] || {{fragment|green|black}} || — || 4 || — || 361 |
| 1 || align="left" | [[Nightmare in Silver: Closed for Business]] || [[File:tv.png|25px|Episode tie-in]] || {{fragment|green|black}} || — || 4 || — || 361 |
||
| Line 23: | Line 23: | ||
| 2 || align="left" | [[Nightmare in Silver: Stalemate!]] || [[File:tv.png|25px|Episode tie-in]] || {{fragment|green|red}} || — || 5 || — || 384 |
| 2 || align="left" | [[Nightmare in Silver: Stalemate!]] || [[File:tv.png|25px|Episode tie-in]] || {{fragment|green|red}} || — || 5 || — || 384 |
||
|- |
|- |
||
| − | | 3 || align="left" | [[Nightmare in Silver: Mr. Clever]] || [[File:tv.png|25px|Episode tie-in]] || {{fragment|red |
+ | | 3 || align="left" | [[Nightmare in Silver: Mr. Clever]] || [[File:tv.png|25px|Episode tie-in]] || {{fragment|green|red}} || [[File:Porridge head.png|50px|link=Porridge]] || 4 || — || 394 |
|- |
|- |
||
| − | | 4 || align="left" | [[Asylum of the Daleks: Graveyard]] || [[File:tv.png|25px|Episode tie-in]] || {{fragment|red|black}} || |
+ | | 4 || align="left" | [[Asylum of the Daleks: Graveyard]] || [[File:tv.png|25px|Episode tie-in]] || {{fragment|red|black}} || [[File:Adipose yellow head.jpg|50px|link=Adipose (Yellow)]] || 4 || — || 453 |
|- |
|- |
||
| − | | 5 || align="left" | [[Asylum of the Daleks: Corridor 5L]] || [[File:tv.png|25px|Episode tie-in]] || {{fragment|black|red}} || |
+ | | 5 || align="left" | [[Asylum of the Daleks: Corridor 5L]] || [[File:tv.png|25px|Episode tie-in]] || {{fragment|black|red}} || [[File:Adipose yellow head.jpg|50px|link=Adipose (Yellow)]] || 4 || — || 538 |
|- |
|- |
||
| − | | 6 || align="left" | [[Asylum of the Daleks: Intensive Care]] || [[File:tv.png|25px|Episode tie-in]] || {{fragment|red|black}} || [[File:Rory Williams head.png|50px |
+ | | 6 || align="left" | [[Asylum of the Daleks: Intensive Care]] || [[File:tv.png|25px|Episode tie-in]] || {{fragment|red|black}} || [[File:Rory Williams head.png|50px|link=Rory Williams]] || 5 || — || 625 |
|- |
|- |
||
| − | | 7 || align="left" | [[Dalek Paradox]] || || {{fragment|blue|red}} || [[File:The Tenth Doctor head.png|50px |
+ | | 7 || align="left" | [[Dalek Paradox]] || || {{fragment|blue|red}} || [[File:The Tenth Doctor head.png|50px|link=Tenth Doctor]] || 5 || — || 1553 |
|- |
|- |
||
| 8 || align="left" | [[Sontaran Disturbance: England]] || || {{fragment|yellow}} || [[File:11 Stetson Icon.jpg|50px|link=Eleventh Doctor]] || 3 || — || 677 |
| 8 || align="left" | [[Sontaran Disturbance: England]] || || {{fragment|yellow}} || [[File:11 Stetson Icon.jpg|50px|link=Eleventh Doctor]] || 3 || — || 677 |
||
| Line 37: | Line 37: | ||
| 9 || align="left" | [[The Snowmen: Backstreets of London]] || [[File:tv.png|25px|Episode tie-in]] || {{fragment|yellow}} || [[File:Adipose yellow head.jpg|50px|link=Adipose (Yellow)]] || 3 || — || 1339 |
| 9 || align="left" | [[The Snowmen: Backstreets of London]] || [[File:tv.png|25px|Episode tie-in]] || {{fragment|yellow}} || [[File:Adipose yellow head.jpg|50px|link=Adipose (Yellow)]] || 3 || — || 1339 |
||
|- |
|- |
||
| − | | 10 || align="left" | [[The Snowmen: The Latimer Residence]] || [[File:tv.png|25px|Episode tie-in]] || {{fragment|yellow}} || |
+ | | 10 || align="left" | [[The Snowmen: The Latimer Residence]] || [[File:tv.png|25px|Episode tie-in]] || {{fragment|yellow}} || [[File:Jagganth Daiki-Nagata Head.png|50px|link=Jagganth Daiki-Nagata]] || 4 || — || 2014 |
|- |
|- |
||
| − | | 11 || align="left" | [[The Snowmen: The Great Intelligence]] || [[File:tv.png|25px|Episode tie-in]] || {{fragment |
+ | | 11 || align="left" | [[The Snowmen: The Great Intelligence]] || [[File:tv.png|25px|Episode tie-in]] || {{fragment|black}} || [[File:Strax head.png|50px|link=Strax]] || 1 || — || 3195 |
|- |
|- |
||
| 12 || align="left" | [[March of the Cybermen]] || || {{fragment|green|red}} || — || 3 || — || 1649 |
| 12 || align="left" | [[March of the Cybermen]] || || {{fragment|green|red}} || — || 3 || — || 1649 |
||
|- |
|- |
||
| − | | 13 || align="left" | [[The Red Castle]] || || {{fragment| |
+ | | 13 || align="left" | [[The Red Castle]] || || {{fragment|yellow|green}} || [[File:Punishment Soldier head.png|50px|link=Punishment Soldier]] || 3 || — || 1886 |
|- |
|- |
||
| − | | 14 || align="left" | [[Ascent of the Governess]] || || {{fragment|yellow}} || [[File:Punishment Medic head.png|50px |
+ | | 14 || align="left" | [[Ascent of the Governess]] || || {{fragment|yellow}} || [[File:Punishment Medic head.png|50px|link=Punishment Medic]] || 2 || — || 2667 |
|- |
|- |
||
| − | | 15 || align="left" | [[The Silent Paradox]] || || {{fragment|yellow |
+ | | 15 || align="left" | [[The Silent Paradox]] || || {{fragment|blue|yellow}} || [[File:The Sixth Doctor head.png|50px|link=Sixth Doctor]] || 3 || — || 2851 |
|- |
|- |
||
| − | | 16 || align="left" | [[Time Attack: The Silent]] || || {{fragment|yellow}} || [[File:Artie head.png|50px |
+ | | 16 || align="left" | [[Time Attack: The Silent]] || || {{fragment|yellow}} || [[File:Artie head.png|50px|link=Artie Maitland]] || 3 || 500|| 3207 |
|- |
|- |
||
| − | | 17 || align="left" | [[Sontaran Disturbance: |
+ | | 17 || align="left" | [[Sontaran Disturbance: France]] || || {{fragment|yellow}} || [[File:11 Monk Icon.jpg|50px|link=Eleventh Doctor]] ||3 ||— ||3051 |
|- |
|- |
||
| 18 || align="left" | [[Angels Take Manhattan: 2012]] || [[File:tv.png|25px|Episode tie-in]] || {{fragment|blue}} || — ||3 ||— ||5050 |
| 18 || align="left" | [[Angels Take Manhattan: 2012]] || [[File:tv.png|25px|Episode tie-in]] || {{fragment|blue}} || — ||3 ||— ||5050 |
||
| Line 57: | Line 57: | ||
| 19 || align="left" | [[Angels Take Manhattan: The Basement]] || [[File:tv.png|25px|Episode tie-in]] || {{fragment|blue}} || — ||4 ||— ||5766 |
| 19 || align="left" | [[Angels Take Manhattan: The Basement]] || [[File:tv.png|25px|Episode tie-in]] || {{fragment|blue}} || — ||4 ||— ||5766 |
||
|- |
|- |
||
| − | | 20 || align="left" | [[Angels Take Manhattan: 1938]] || [[File:tv.png|25px|Episode tie-in]] || {{fragment|blue|yellow}} || [[File:River Song head.png|50px |
+ | | 20 || align="left" | [[Angels Take Manhattan: 1938]] || [[File:tv.png|25px|Episode tie-in]] || {{fragment|blue|yellow}} || [[File:River Song head.png|50px|link=River Song]] ||4 ||— ||7000 |
|- |
|- |
||
| − | | 21 || align="left" | [[Hearts of Steel]] || || {{fragment|red|green}} || |
+ | | 21 || align="left" | [[Hearts of Steel]] || || {{fragment|red|green}} || [[File:Amy Pond head.png|50px|link=Amy Pond]] || 3 || — || 5140 |
|- |
|- |
||
| − | | 22 || align="left" | [[Nerves of Dalekanium]] || || {{fragment|black| |
+ | | 22 || align="left" | [[Nerves of Dalekanium]] || || {{fragment|black|blue}} || [[File:Angie head.png|50px|link=Angie Maitland]] ||3 ||— ||5587 |
|- |
|- |
||
| − | | 23 || align="left" | [[Fists of Arnickleton]] || || {{fragment| |
+ | | 23 || align="left" | [[Fists of Arnickleton]] || || {{fragment|red|blue}} || [[File:Clara Oswald head.png|50px|link=Clara Oswald]] ||4 ||— ||4582 |
|- |
|- |
||
| 24 || align="left" | [[Dinosaurs on a Spaceship: Incoming 6H 19M!]] || [[File:tv.png|25px|Episode tie-in]] || {{fragment|red}} || — ||4 ||— ||6948 |
| 24 || align="left" | [[Dinosaurs on a Spaceship: Incoming 6H 19M!]] || [[File:tv.png|25px|Episode tie-in]] || {{fragment|red}} || — ||4 ||— ||6948 |
||
|- |
|- |
||
| − | | 25 || align="left" | [[Dinosaurs on a Spaceship: Awakening]] || [[File:tv.png|25px|Episode tie-in]] || {{fragment|red|green}} || — || |
+ | | 25 || align="left" | [[Dinosaurs on a Spaceship: Awakening]] || [[File:tv.png|25px|Episode tie-in]] || {{fragment|red|green}} || — ||4 ||— ||8605 |
|- |
|- |
||
| − | | 26 || align="left" | [[Dinosaurs on a Spaceship: Run!]] || [[File:tv.png|25px|Episode tie-in]] || {{fragment|red|green}} || [[File:Brian Williams head.png|50px |
+ | | 26 || align="left" | [[Dinosaurs on a Spaceship: Run!]] || [[File:tv.png|25px|Episode tie-in]] || {{fragment|red|green}} || [[File:Brian Williams head.png|50px|link=Brian Williams]] ||4 ||— ||9351 |
|- |
|- |
||
| − | | 27 || align="left" | [[Solomons Robots]] || || {{fragment|green}} || [[File:Nefertiti head.png|50px |
+ | | 27 || align="left" | [[Solomons Robots]] || || {{fragment|green}} || [[File:Nefertiti head.png|50px|link=Queen Nefertiti]] || 1 || — || 5651 |
|- |
|- |
||
| − | | 28 || align="left" | [[Terror of the Weeping Angels]] || || {{fragment|blue}} || — || |
+ | | 28 || align="left" | [[Terror of the Weeping Angels]] || || {{fragment|blue}} || — ||4 ||— ||6025 |
|- |
|- |
||
| − | | 29 || align="left" | [[Revenge of Liberty]] || || {{fragment|blue}} || [[File:Sam Garner head.png|50px |
+ | | 29 || align="left" | [[Revenge of Liberty]] || || {{fragment|blue}} || [[File:Sam Garner head.png|50px|link=Sam Garner]] ||3 ||— ||6519 |
|- |
|- |
||
| 30 || align="left" | [[Daleks and Cybermen!]] || || {{fragment|red|yellow}} || — ||5 ||— ||6689 |
| 30 || align="left" | [[Daleks and Cybermen!]] || || {{fragment|red|yellow}} || — ||5 ||— ||6689 |
||
|- |
|- |
||
| − | | 31 || align="left" | [[Time Attack: Daleks and Cybermen]] || || {{fragment| |
+ | | 31 || align="left" | [[Time Attack: Daleks and Cybermen]] || || {{fragment|black|red}} || — ||4 ||950 ||7568 |
|- |
|- |
||
| 32 || align="left" | [[Sontaran Disturbance: Mars]] || || {{fragment|yellow|red}} || [[File:11 Motorbike Icon.jpg|50px|link=Eleventh Doctor]] ||4 ||— ||6621 |
| 32 || align="left" | [[Sontaran Disturbance: Mars]] || || {{fragment|yellow|red}} || [[File:11 Motorbike Icon.jpg|50px|link=Eleventh Doctor]] ||4 ||— ||6621 |
||
|- |
|- |
||
| − | | 33 || align="left" | [[Stampeding Dinosaurs!]] || || {{fragment|red|yellow}} || [[File:John Riddell head.png|50px |
+ | | 33 || align="left" | [[Stampeding Dinosaurs!]] || || {{fragment|red|yellow}} || [[File:John Riddell head.png|50px|link=John Riddell]] ||5 ||— ||7024 |
|- |
|- |
||
| − | | 34 || align="left" | [[Paradox of the Weeping Angels]] || || {{fragment|blue}} || [[File:The Seventh Doctor head.png|50px |
+ | | 34 || align="left" | [[Paradox of the Weeping Angels]] || || {{fragment|blue}} || [[File:The Seventh Doctor head.png|50px|link=Seventh Doctor]] ||4 ||— ||8526 |
|- |
|- |
||
| 35 || align="left" | [[The Bells of Saint John: R Y C B A R 1 2 3]] || [[File:tv.png|25px|Episode tie-in]] || {{fragment|green|black}} || — ||6 ||— ||12936 |
| 35 || align="left" | [[The Bells of Saint John: R Y C B A R 1 2 3]] || [[File:tv.png|25px|Episode tie-in]] || {{fragment|green|black}} || — ||6 ||— ||12936 |
||
|- |
|- |
||
| − | | 36 || align="left" | [[The Bells of Saint John: Miss Kizlet]] || [[File:tv.png|25px|Episode tie-in]] || {{fragment|green|yellow}} || — || |
+ | | 36 || align="left" | [[The Bells of Saint John: Miss Kizlet]] || [[File:tv.png|25px|Episode tie-in]] || {{fragment|green|yellow}} || — ||4 ||— ||13425 |
|- |
|- |
||
| − | | 37 || align="left" | [[The Bells of Saint John: He Returns]] || [[File:tv.png|25px|Episode tie-in]] || {{fragment|green|black}} || [[File:Spoonhead 11th Doctor head.png|50px |
+ | | 37 || align="left" | [[The Bells of Saint John: He Returns]] || [[File:tv.png|25px|Episode tie-in]] || {{fragment|green|black}} || [[File:Spoonhead 11th Doctor head.png|50px|link=Spoonhead 11th Doctor]] ||4 ||— ||13851 |
|- |
|- |
||
| − | | 38 || align="left" | [[Attack of the |
+ | | 38 || align="left" | [[Attack of the Chapter one Robots]] || || {{fragment|green|red}} || [[File:Porridge Bomb Icon.jpg|50px|link=Porridge]] ||5 ||— ||9047 |
|- |
|- |
||
| − | | 39 || align="left" | [[Time Attack: Robots!]] || || {{fragment|green|red}} || [[File:John Riddell Rifle Icon.jpg|50px|link=John Riddell]] || |
+ | | 39 || align="left" | [[Time Attack: Robots!]] || || {{fragment|green|red}} || [[File:John Riddell Rifle Icon.jpg|50px|link=John Riddell]] ||5 ||700 ||9124 |
|- |
|- |
||
| − | | 40 || align="left" | [[The Return of Mr. Clever!]] || || {{fragment|green}} || [[File:Unit Soldier head.jpg|50px |
+ | | 40 || align="left" | [[The Return of Mr. Clever!]] || || {{fragment|green}} || [[File:Unit Soldier head.jpg|50px|link=UNIT Soldier]] ||3 ||— ||8613 |
|- |
|- |
||
| 41 || align="left" | [[Sontaran Disturbance: The Snowmen]] || || {{fragment|yellow}} || [[File:11 Soothsayer Icon.jpg|50px|link=Eleventh Doctor]] ||5 ||— ||9044 |
| 41 || align="left" | [[Sontaran Disturbance: The Snowmen]] || || {{fragment|yellow}} || [[File:11 Soothsayer Icon.jpg|50px|link=Eleventh Doctor]] ||5 ||— ||9044 |
||
| Line 107: | Line 107: | ||
| 44 || align="left" | [[The Name of the Doctor: A Wound in Time]] || [[File:tv.png|25px|Episode tie-in]] || {{fragment|black}} || [[File:11 Fez Icon.jpg|50px|link=Eleventh Doctor]] ||2 ||— ||16551 |
| 44 || align="left" | [[The Name of the Doctor: A Wound in Time]] || [[File:tv.png|25px|Episode tie-in]] || {{fragment|black}} || [[File:11 Fez Icon.jpg|50px|link=Eleventh Doctor]] ||2 ||— ||16551 |
||
|- |
|- |
||
| − | | 45 || align="left" | [[The Allies of the Great Intelligence]] || || {{fragment|black|green}} || — || |
+ | | 45 || align="left" | [[The Allies of the Great Intelligence]] || || {{fragment|black|green}} || — ||4 ||— ||9857 |
|- |
|- |
||
| 46 || align="left" | [[Time Attack: The allies of the Great Intelligence]] || || {{fragment|green|black}} || [[File:Clara Oswald Souffle Icon.jpg|50px|link=Clara Oswald]] ||6 ||800 ||10279 |
| 46 || align="left" | [[Time Attack: The allies of the Great Intelligence]] || || {{fragment|green|black}} || [[File:Clara Oswald Souffle Icon.jpg|50px|link=Clara Oswald]] ||6 ||800 ||10279 |
||
|- |
|- |
||
| − | | 47 || align="left" | [[Whispermen Paradox]] || || {{fragment|black|blue}} || [[File:The Eighth Doctor head.png|50px |
+ | | 47 || align="left" | [[Whispermen Paradox]] || || {{fragment|black|blue}} || [[File:The Eighth Doctor head.png|50px|link=Eighth Doctor]] ||4 ||— ||12068 |
|- |
|- |
||
| − | | 48 || align="left" | [[ |
+ | | 48 || align="left" | [[Chapter one finale: An Ancient Hatred]] || || {{fragment|black|green}} || [[File:Jo Grant Head.png|50px|link=Jo Grant]] || 1 || — || 13324 |
|} |
|} |
||
| − | |||
| − | == Storyline == |
||
| − | : ''See [[Storyline#Chapter 1|Storyline]]'' |
||
== Allies == |
== Allies == |
||
| − | The following allies can be unlocked in Chapter 1 levels |
+ | The following allies can be unlocked in Chapter 1 levels. |
{| class="wikitable sortable" border="1" style="text-align:center" |
{| class="wikitable sortable" border="1" style="text-align:center" |
||
! Ally |
! Ally |
||
! Drop |
! Drop |
||
| − | ! Add'l Costumes |
||
! Note |
! Note |
||
|- |
|- |
||
| [[File:The Eleventh Doctor head.png|50px|link=Eleventh Doctor]] |
| [[File:The Eleventh Doctor head.png|50px|link=Eleventh Doctor]] |
||
| None (game start) |
| None (game start) |
||
| − | | 8 |
||
| |
| |
||
|- |
|- |
||
| [[File:Madame Vastra head.png|50px|link=Madame Vastra]] |
| [[File:Madame Vastra head.png|50px|link=Madame Vastra]] |
||
| None (game start) |
| None (game start) |
||
| − | | 2 |
||
| |
| |
||
|- |
|- |
||
| [[File:Jenny Flint head.png|50px|link=Jenny Flint]] |
| [[File:Jenny Flint head.png|50px|link=Jenny Flint]] |
||
| None (game start) |
| None (game start) |
||
| − | | 2 |
||
| |
| |
||
|- |
|- |
||
| [[File:Porridge head.png|50px|link=Porridge]] |
| [[File:Porridge head.png|50px|link=Porridge]] |
||
| [[Nightmare in Silver: Mr. Clever]] |
| [[Nightmare in Silver: Mr. Clever]] |
||
| − | | 1 |
||
| 100% Drop Rate |
| 100% Drop Rate |
||
| ⚫ | |||
| + | |[[File:Adipose yellow head.jpg|50px|link=Adipose (Yellow)]] |
||
| ⚫ | |||
| + | [[Asylum of the Daleks: Graveyard]]<br />[[Asylum of the Daleks: Corridor 5L]]<br />[[The Snowmen: Backstreets of London]] |
||
| ⚫ | |||
|- |
|- |
||
| [[File:Rory Williams head.png|50px|link=Rory Williams]] |
| [[File:Rory Williams head.png|50px|link=Rory Williams]] |
||
| [[Asylum of the Daleks: Intensive Care]] |
| [[Asylum of the Daleks: Intensive Care]] |
||
| − | | — |
||
|100% Drop Rate |
|100% Drop Rate |
||
|- |
|- |
||
| [[File:The Tenth Doctor head.png|50px|link=Tenth Doctor]] |
| [[File:The Tenth Doctor head.png|50px|link=Tenth Doctor]] |
||
| [[Dalek Paradox]] |
| [[Dalek Paradox]] |
||
| ⚫ | |||
| − | | 6 |
||
| ⚫ | |||
| ⚫ | |||
|- |
|- |
||
| − | |[[File: |
+ | | [[File:Jagganth Daiki-Nagata Head.png|50px|link=Jagganth Daiki-Nagata]] |
| − | |[[The Snowmen: |
+ | |[[The Snowmen: The Latimer Residence]] |
| + | |100% Drop Rate |
||
| − | |— |
||
| ⚫ | |||
|- |
|- |
||
| [[File:Strax head.png|50px|link=Strax]] |
| [[File:Strax head.png|50px|link=Strax]] |
||
| [[The Snowmen: The Great Intelligence]] |
| [[The Snowmen: The Great Intelligence]] |
||
| − | | 2 |
||
| |
| |
||
|- |
|- |
||
| [[File:Punishment Soldier head.png|50px|link=Punishment Soldier]] |
| [[File:Punishment Soldier head.png|50px|link=Punishment Soldier]] |
||
| [[The Red Castle]] |
| [[The Red Castle]] |
||
| − | | — |
||
| |
| |
||
|- |
|- |
||
| [[File:Punishment Medic head.png|50px|link=Punishment Medic]] |
| [[File:Punishment Medic head.png|50px|link=Punishment Medic]] |
||
| [[Ascent of the Governess]] |
| [[Ascent of the Governess]] |
||
| − | | — |
||
| |
| |
||
|- |
|- |
||
| [[File:The Sixth Doctor head.png|50px|link=Sixth Doctor]] |
| [[File:The Sixth Doctor head.png|50px|link=Sixth Doctor]] |
||
| [[The Silent Paradox]] |
| [[The Silent Paradox]] |
||
| − | | 1 |
||
| 100% Drop Rate |
| 100% Drop Rate |
||
|- |
|- |
||
| [[File:Artie head.png|50px|link=Artie Maitland]] |
| [[File:Artie head.png|50px|link=Artie Maitland]] |
||
| [[Time Attack: The Silent]] |
| [[Time Attack: The Silent]] |
||
| − | | — |
||
| |
| |
||
|- |
|- |
||
| [[File:River Song head.png|50px|link=River Song]] |
| [[File:River Song head.png|50px|link=River Song]] |
||
| [[Angels Take Manhattan: 1938]] |
| [[Angels Take Manhattan: 1938]] |
||
| − | | |
+ | | |
| ⚫ | |||
| + | | [[File:Amy Pond head.png|50px|link=Amy Pond]] |
||
| + | | [[Hearts of Steel]] |
||
| |
| |
||
|- |
|- |
||
| [[File:Angie head.png|50px|link=Angie Maitland]] |
| [[File:Angie head.png|50px|link=Angie Maitland]] |
||
| [[Nerves of Dalekanium]] |
| [[Nerves of Dalekanium]] |
||
| − | | — |
||
| |
| |
||
|- |
|- |
||
| [[File:Clara Oswald head.png|50px|link=Clara Oswald]] |
| [[File:Clara Oswald head.png|50px|link=Clara Oswald]] |
||
| [[Fists of Arnickleton]] |
| [[Fists of Arnickleton]] |
||
| + | |100% Drop Rate |
||
| − | | 2 |
||
| ⚫ | |||
|- |
|- |
||
| [[File:Brian Williams head.png|50px|link=Brian Williams]] |
| [[File:Brian Williams head.png|50px|link=Brian Williams]] |
||
| [[Dinosaurs on a Spaceship: Run!]] |
| [[Dinosaurs on a Spaceship: Run!]] |
||
| − | | — |
||
| |
| |
||
|- |
|- |
||
| [[File:Nefertiti head.png|50px|link=Queen Nefertiti]] |
| [[File:Nefertiti head.png|50px|link=Queen Nefertiti]] |
||
| [[Solomons Robots]] |
| [[Solomons Robots]] |
||
| − | | — |
||
| |
| |
||
|- |
|- |
||
| [[File:Sam Garner head.png|50px|link=Sam Garner]] |
| [[File:Sam Garner head.png|50px|link=Sam Garner]] |
||
| [[Revenge of Liberty]] |
| [[Revenge of Liberty]] |
||
| + | |100% Drop Rate |
||
| − | | — |
||
| ⚫ | |||
|- |
|- |
||
| [[File:John Riddell head.png|50px|link=John Riddell]] |
| [[File:John Riddell head.png|50px|link=John Riddell]] |
||
| [[Stampeding Dinosaurs!]] |
| [[Stampeding Dinosaurs!]] |
||
| + | |100% Drop Rate |
||
| − | | 1 |
||
| − | | |
||
|- |
|- |
||
| [[File:The Seventh Doctor head.png|50px|link=Seventh Doctor]] |
| [[File:The Seventh Doctor head.png|50px|link=Seventh Doctor]] |
||
| [[Paradox of the Weeping Angels]] |
| [[Paradox of the Weeping Angels]] |
||
| − | | 1 |
||
| 100% Drop Rate |
| 100% Drop Rate |
||
|- |
|- |
||
| [[File:Spoonhead 11th Doctor head.png|50px|link=Spoonhead 11th Doctor]] |
| [[File:Spoonhead 11th Doctor head.png|50px|link=Spoonhead 11th Doctor]] |
||
| [[The Bells of Saint John: He Returns]] |
| [[The Bells of Saint John: He Returns]] |
||
| − | | — |
||
| |
| |
||
|- |
|- |
||
| [[File:Unit Soldier head.jpg|50px|link=UNIT Soldier]] |
| [[File:Unit Soldier head.jpg|50px|link=UNIT Soldier]] |
||
| [[The Return of Mr. Clever!]] |
| [[The Return of Mr. Clever!]] |
||
| − | | — |
||
| |
| |
||
|- |
|- |
||
| [[File:The Eighth Doctor head.png|50px|link=Eighth Doctor]] |
| [[File:The Eighth Doctor head.png|50px|link=Eighth Doctor]] |
||
| [[Whispermen Paradox]] |
| [[Whispermen Paradox]] |
||
| − | | 2 |
||
| 100% Drop Rate |
| 100% Drop Rate |
||
|- |
|- |
||
| − | | [[File: |
+ | | [[File:Jo Grant Head.png|50px|link=Jo Grant]] |
| − | | [[ |
+ | | [[Chapter one finale: An Ancient Hatred]] |
| + | |100% Drop Rate |
||
| − | | — |
||
| − | | |
||
|} |
|} |
||
| Line 256: | Line 236: | ||
! Ally |
! Ally |
||
! Description |
! Description |
||
| − | ! Episode |
||
! Drop |
! Drop |
||
|- |
|- |
||
| − | | [[File:11 Stetson Icon.jpg|50px|link=Eleventh Doctor]] || Stetson |
+ | | [[File:11 Stetson Icon.jpg|50px|link=Eleventh Doctor]] || Stetson || [[Sontaran Disturbance: England]] |
|- |
|- |
||
| − | | [[File:11 Monk Icon.jpg|50px|link=Eleventh Doctor]] || Monk |
+ | | [[File:11 Monk Icon.jpg|50px|link=Eleventh Doctor]] || Monk || [[Sontaran Disturbance: USA]] |
|- |
|- |
||
| − | | [[File:11 Motorbike Icon.jpg|50px|link=Eleventh Doctor]] || Motorbike |
+ | | [[File:11 Motorbike Icon.jpg|50px|link=Eleventh Doctor]] || Motorbike || [[Sontaran Disturbance: Mars]] |
|- |
|- |
||
| − | | [[File:Porridge Bomb Icon.jpg|50px|link=Porridge]] || Bomb-carrying |
+ | | [[File:Porridge Bomb Icon.jpg|50px|link=Porridge]] || Bomb-carrying || [[Attack of the Season 7 Robots]] |
|- |
|- |
||
| − | | [[File:John Riddell Rifle Icon.jpg|50px|link=John Riddell]] || Rifle-carrying |
+ | | [[File:John Riddell Rifle Icon.jpg|50px|link=John Riddell]] || Rifle-carrying || [[Time Attack: Robots!]] |
|- |
|- |
||
| − | | [[File:11 Soothsayer Icon.jpg|50px|link=Eleventh Doctor]] || Soothsayer |
+ | | [[File:11 Soothsayer Icon.jpg|50px|link=Eleventh Doctor]] || Soothsayer || [[Sontaran Disturbance: The Snowmen]] |
|- |
|- |
||
| − | |[[File:10 Coat Icon.jpg|50px|link=The_Tenth_Doctor]] |
+ | |[[File:10 Coat Icon.jpg|50px|link=The_Tenth_Doctor]] || Coat || [[The Name of the Doctor: Trenzalore]] |
| − | |Coat |
||
| − | |Revived Series 2 - 4 |
||
| − | |[[The Name of the Doctor: Trenzalore]] |
||
|- |
|- |
||
| − | | [[File:11 Fez Icon.jpg|50px|link=Eleventh Doctor]] || Fez |
+ | | [[File:11 Fez Icon.jpg|50px|link=Eleventh Doctor]] || Fez || [[The Name of the Doctor: A Wound in Time]] |
|- |
|- |
||
| − | | [[File:Clara Oswald Souffle Icon.jpg|50px|link=Clara Oswald]] || Soufflé girl |
+ | | [[File:Clara Oswald Souffle Icon.jpg|50px|link=Clara Oswald]] || Soufflé girl || [[Time Attack: The allies of the Great Intelligence]] |
|} |
|} |
||
== Referenced Episodes == |
== Referenced Episodes == |
||
| − | The following |
+ | The following television episodes are directly referenced in Chapter 1 levels. |
{| class="wikitable" border="1" |
{| class="wikitable" border="1" |
||
Latest revision as of 18:53, 27 June 2017
Chapter 1: The Sontaran Threat (originally known as Season 7) is one of the two seasons of Doctor Who: Legacy available since its initial launch. Its content features primarily creatures, companions, and plot lines from the seventh season of the revived television series. The season is 48 levels long and grants access to 24 allies and 9 alternate outfits.
Levels
The following levels are available in Chapter 1.
Allies
The following allies can be unlocked in Chapter 1 levels.
| Ally | Drop | Note |
|---|---|---|

|
None (game start) | |

|
None (game start) | |

|
None (game start) | |

|
Nightmare in Silver: Mr. Clever | 100% Drop Rate |

|
Asylum of the Daleks: Graveyard |
|

|
Asylum of the Daleks: Intensive Care | 100% Drop Rate |

|
Dalek Paradox | 100% Drop Rate |

|
The Snowmen: The Latimer Residence | 100% Drop Rate |

|
The Snowmen: The Great Intelligence | |

|
The Red Castle | |

|
Ascent of the Governess | |

|
The Silent Paradox | 100% Drop Rate |

|
Time Attack: The Silent | |

|
Angels Take Manhattan: 1938 | |

|
Hearts of Steel | |

|
Nerves of Dalekanium | |

|
Fists of Arnickleton | 100% Drop Rate |

|
Dinosaurs on a Spaceship: Run! | |

|
Solomons Robots | |

|
Revenge of Liberty | 100% Drop Rate |

|
Stampeding Dinosaurs! | 100% Drop Rate |

|
Paradox of the Weeping Angels | 100% Drop Rate |

|
The Bells of Saint John: He Returns | |

|
The Return of Mr. Clever! | |

|
Whispermen Paradox | 100% Drop Rate |

|
Chapter one finale: An Ancient Hatred | 100% Drop Rate |
Outfits
The following alternate outfits can be unlocked during Chapter 1 levels.
| Ally | Description | Drop |
|---|---|---|
| Stetson | Sontaran Disturbance: England | |
| Monk | Sontaran Disturbance: USA | |
| Motorbike | Sontaran Disturbance: Mars | |
| Bomb-carrying | Attack of the Season 7 Robots | |
| Rifle-carrying | Time Attack: Robots! | |
| Soothsayer | Sontaran Disturbance: The Snowmen | |
| Coat | The Name of the Doctor: Trenzalore | |
| Fez | The Name of the Doctor: A Wound in Time | |
| Soufflé girl | Time Attack: The allies of the Great Intelligence |
Referenced Episodes
The following television episodes are directly referenced in Chapter 1 levels.